Backend Prereqs
This page outlines the tools and setup required before running any OSU Sustainability Office backend projects locally.
What you need
IDE
Use any editor you like. VS Code works great.
- If using VS Code, make sure you install extensions that are relevant to the repository (Vue, ESLint, Prettier, etc.)
NVM / Node.JS
Using a version manager makes switching Node versions seamless.
- Apple / Linux: https://github.com/nvm-sh/nvm
- Windows: https://github.com/coreybutler/nvm-windows
- Uninstall any existing Node first: see the “Installation & Upgrades” notes on that page.
- Choose the Node version listed in the project’s README (if present). If unsure, try a long-term support node version (e.g. Node 18 or 20).
Docker
- Docker & Docker Compose (for local backend testing):
- https://docs.docker.com/engine/install/
- Select “Docker Desktop for <Your Platform>”
Yarn (required only for wiki development)
Install after Node is set up. You may have to re-run this if you switch NodeJS versions with NVM as listed below.
npm install --global yarn
AWS Setup
Used for deploying serverless backends.
info
AWS CLI and SAM CLI can be installed immediately, but you cannot configure credentials until OSU IT activates your account.
warning
Some AWS instructions may become outdated as AWS updates its policies or UI. Always cross-check with Official AWS IAM Docs
Step 1: Account Setup
- Login via OSU SSO
- If you don’t have access yet, contact a current Sustainability Office Software Intern or reach out to leanne@engr.oregonstate.edu.
Step 2: Create IAM User
- Go to IAM Users
- Click Add User
- Name format: yourname-cli
- Check both AWS Console Access and Password options
- Copy permissions from an existing user ending with -cli (e.g., samantha-cli)
- Finish creation, and note your temporary password.
Step 3: Create Access Keys
Open your new IAM user → Create access key
- Select Other → Continue → Create
- Copy and securely store both your Access Key ID and Secret Access Key (you will not be able to view the secret again).
AWS CLI (for verifying AWS credentials):
- Installation: https://docs.aws.amazon.com/cli/latest/userguide/getting-started-install.html
- Configuration Documentation: https://docs.aws.amazon.com/cli/latest/userguide/getting-started-quickstart.html
- Run
aws configurein the command line after installation. - Fill in all details (refer to IAM section for Access Key ID and Secret Access Key). Make sure to select “us-west-2” for region. I think default output can be left as json.
AWS SAM CLI (CLI for serverless backend):
AWS CLI
Used to verify AWS credentials.
Run after installation:
aws configure- Fill in all details (refer to IAM section for Access Key ID and Secret Access Key)
- Region: us-west-2
- Output Format: json
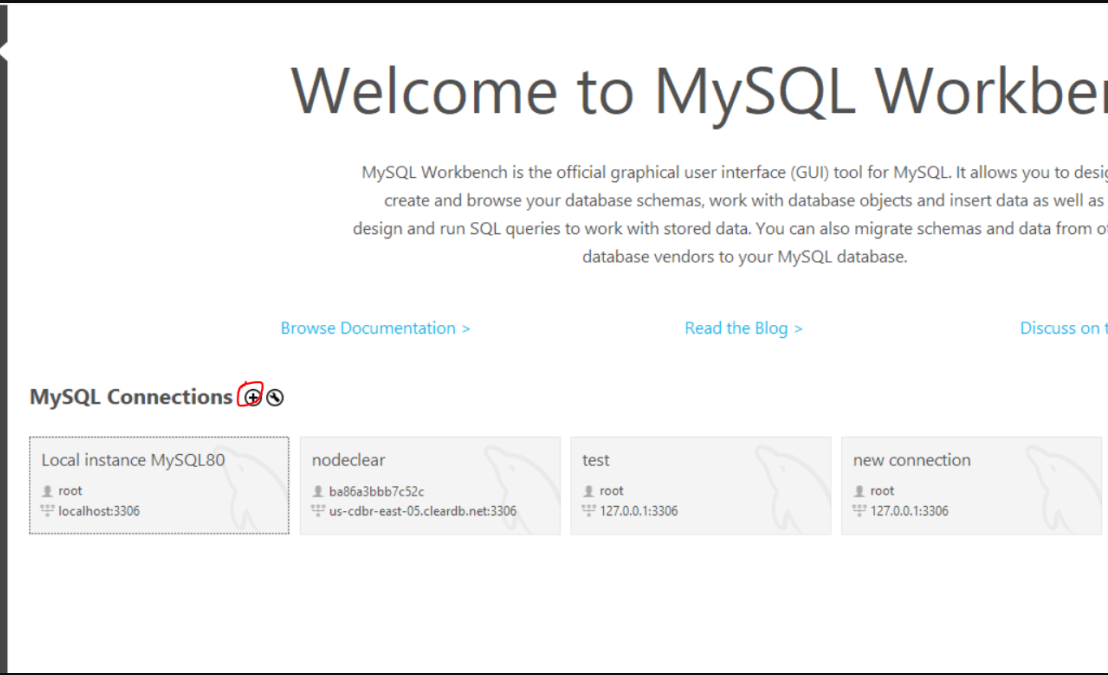
MySQL Workbench
Used for debugging database.
Step 1: Download MySQL Workbench
Step 2: Create a new connection using the + icon
Step 3: Setup MySQL
- Select the energy_data schema
- Limit to 50,000 rows to avoid it taking too long
- Run test query, e.g.
select * from data order by time DESC; - Click the lightning symbol to run query.

Documentation Links
- AWS SAM Overview
- Vue3 Documentation
- Vuex / Vue Store
- GitHub Actions (CI/CD)
- Additional Backend Reference (page 8+)
Get Project Running Locally
Step 1: Start Docker Desktop (Backend will not work without Docker running)
Step 2: Open two terminal windows in the project directory.
Terminal 1 (Backend)
cd backend

npm install (first time only)

sam local start-api
Terminal 2 (Frontend):
npm install (first time only)

npm run serve
- Backend is locally hosted at http://localhost:3000
- Frontend is locally hosted at http://localhost:8080
tip
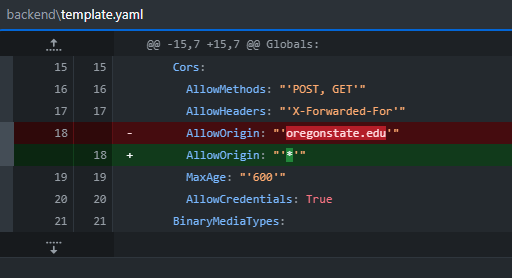
If data is not loading during local development, the backend may be blocking requests due to CORS.
As a temporary debugging step, you can update the backend’s AllowOrigin setting to allow requests from localhost,
as shown in the image below.
Important: This change is for local testing only and must not be deployed to production, as it weakens security.
note
Need both backend and frontend running for it to work.
Current Issues and Planning
Check shared google drive:
- Software meeting notes
- Software Timeline
- GitHub Organization
- Click on a repository, then issues to see current issues.